The Oculus Quest 2 controller is an essential accessory of Oculus Quest 2 to track your hand movement. It runs on battery and this battery will eventually die or exhaust. But, do you know how to replace Oculus Quest 2 controller battery?
Both the right and left Oculus Quest 2 controllers have a battery hub. You just need to open the cover of the battery hub, pull out the old battery and pop in the new ones and close the cover. But if you don’t follow some important steps and instructions, you might damage the controllers.
Replacing the Oculus Quest 2 Controller Battery is easy but you need to follow some important steps, otherwise you might damage the controller. This blog post provides you with all the instructions and the perfect way to replace Oculus Quest 2 Controller Battery. Along with this, you will come to know about the types of batteries to use, voltage of the battery, life of battery and other necessary information.
OCULUS QUEST 2

Oculus Quest 2 is a Virtual Reality(VR) Headset made by Meta (or Facebook). Oculus Quest 2 is also known as Meta Quest 2. It is a standalone VR headset. It means you don’t need a PC or Laptop or mobile to use this headset.
There is an option to connect Oculus Quest 2 to your PC through Oculus Link You can play the PC VR games through this device. You will get a refresh rate of 90Hz.
You can enjoy many contents like games, movies, use horizon workrooms and many more things. To use this VR headset, you need to have a facebook account. There is a guardian to help you to set and do different tasks using this VR headset.
OCULUS 2 CONTROLLER

When you buy Oculus Quest 2, you will get a headset, two controllers, glass spacer and charging cable and adapter. One is the right hand controller and the other is the left hand controller.
The controller is just like a mouse you use with your PC. The right hand controller works like the mostly used left mouse button and vice versa.
The controllers are mostly used for selecting and interacting with the contents provided by Meta for Oculus. The controller has joysticks and buttons for doing the interactions.
OCULUS QUEST 2 CONTROLLER BATTERY
Unlike the Oculus Quest 2 Headset, the Oculus Quest 2 Controller has a removable battery. Each Controller requires an AA battery to function. So, you need 2 AA batteries for the controllers.
The battery compartment is located on the side where the grip button is located. You need to remove the cover to replace the battery. The next section of this blog will show you how to replace oculus quest 2 controller battery?
TYPE OF BATTERIES FOR OCULUS QUEST 2 CONTROLLER
Oculus Quest 2 Controllers require 2 AA batteries. The right controller needs a AA battery and so does the left controller.
OCULUS QUEST 2 CONTROLLER BATTERY VOLTAGE
Since, each controller needs a AA battery, so oculus quest 2 controller battery voltage should be 1.5 Volt. You can use Duracell AA battery or go for Amazon Basics AA battery or AllMax or Energizer. All are 1.5 Volt batteries.
OCULUS QUEST 2 CONTROLLER BATTERY LIFE
The battery life in the oculus 2 controller differs from the type of AAbattery you are using.
The battery life in the right controller is less as compared to the left controller. Since, the right controller is used more as compared to the left controller, so the battery life is less.
HOW TO REPLACE OCULUS QUEST 2 CONTROLLER BATTERY?
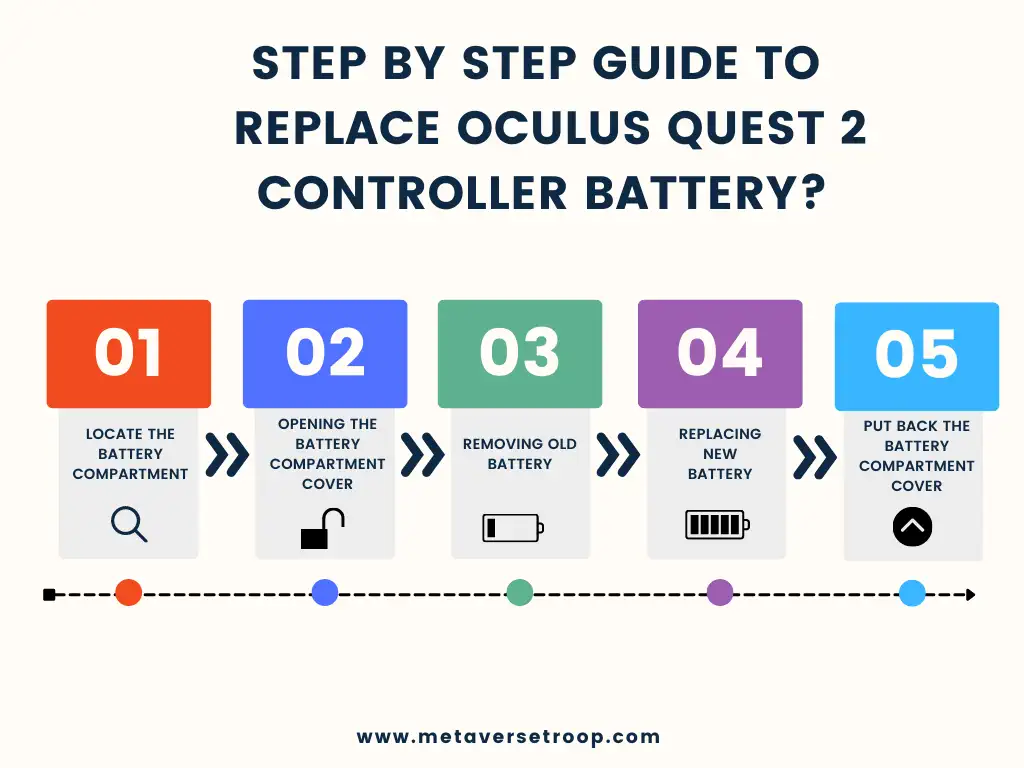
It is very easy to replace oculus quest 2 controller battery, if done in the right way. I will provide you easy to guide how to do so. Just follow the steps.
STEP 1: LOCATE THE BATTERY COMPARTMENT
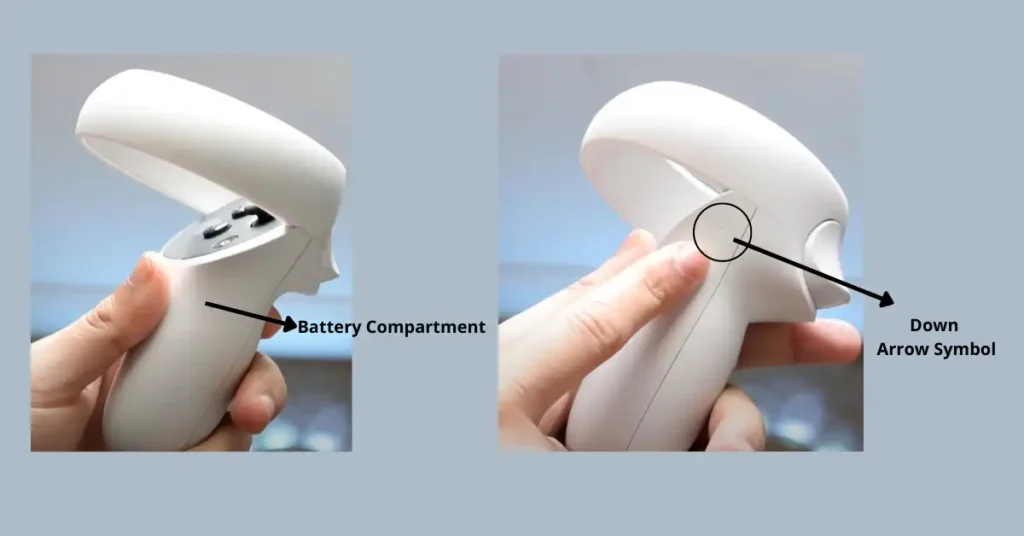
The 1st step to replace Oculus Quest 2 controller battery is to locate the batter compartment of Oculus Quest 2 controller. Locating the battery compartment location of the Oculus Quest 2 controller is a little bit difficult. So, you need some identification to locate it.
There are 2 identifications by which you can easily locate the battery compartment.
- The battery compartment is on the opposite side where the grip button is located.
- There is a downward arrow symbol on the top of the battery compartment.
STEP 2: OPENING THE BATTERY COMPARTMENT COVER
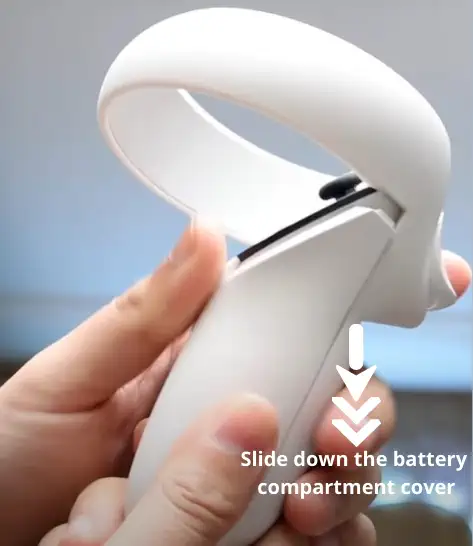
To open the battery compartment, you first have to locate the battery compartment. Then locate the arrow symbol. Just slide down the battery compartment cover in the direction of an arrow. And take the plastic piece out. You will see the battery compartment.
STEP 3: REMOVING OLD BATTERY
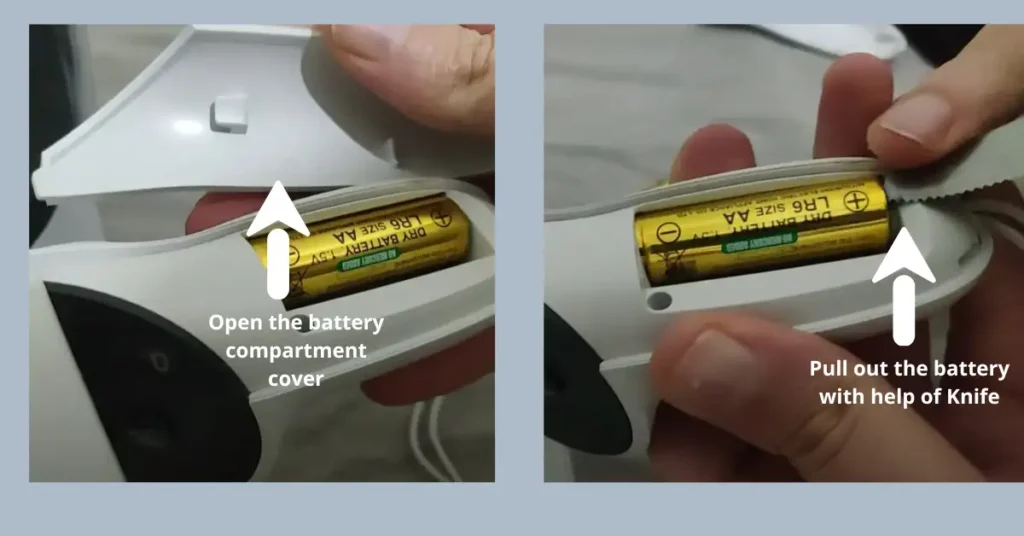
After you have removed the battery cover of Oculus Quest 2. You will see the battery. It will be difficult to pull out the battery with your finger. The best way to do is use a knife or object like this to pull out the battery.
Slide the knife on the +ve side of the battery and thrush out the battery. Just remember the +ve side of the battery is down side of controller or in the opposite direction of Trigger button/Thumbstick..
STEP 4: REPLACING NEW BATTERY
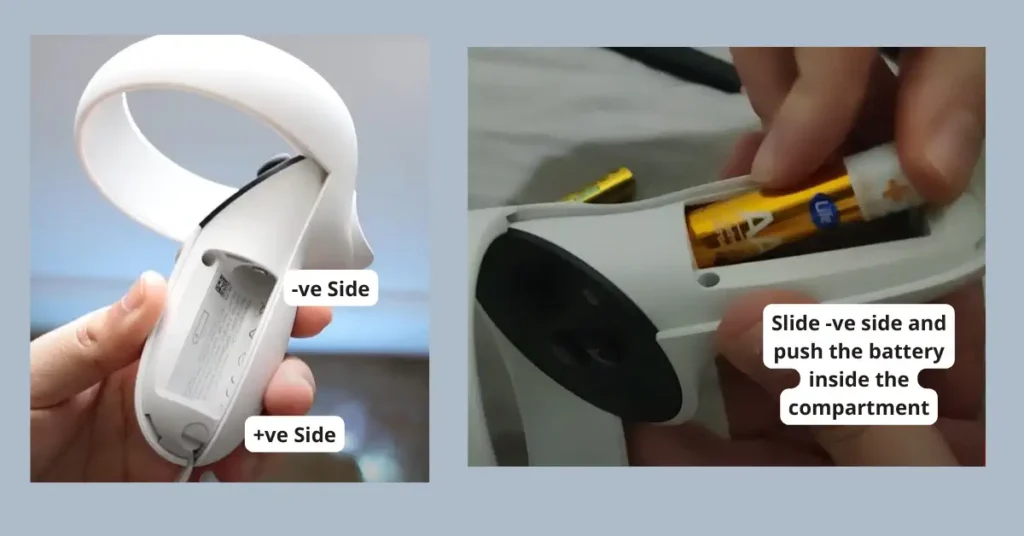
This is the most import step to replace Oculus Quest 2 controller battery. If not done in the right way or the battery is not put in right position, the batteries may explode. So, follow our detailed guide as given below.
Replacing the battery is easy, just you have to pop in a new battery into the Oculus Quest 2 controller battery compartment. But, putting in the right direction i.e +ve of battery in the +ve side of Oculus Quest 2 controller battery compartment.
Just remember +ve of the battery compartment is downward or the direction opposite to trigger button/joysticks. The +ve side of the battery is the top position of the battery that is bulged and the flat side is the -ve side.
Now first slide the -ve side of the battery in the battery compartment and then push the battery with your fingers. The battery will automatically fit in the compartment.
To see whether you have put the battery correctly, just press any button and see whether white indicator light blinks. If it does, go to the next step. If it doesn’t, you say either put the battery in the wrong position or have put in a faulty battery.
STEP 5: PUTTING BACK THE BATTERY COMPARTMENT COVER
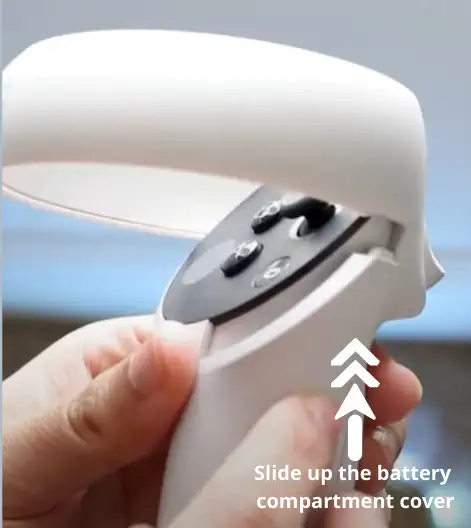
After you have correctly inserted the battery in the compartment, it’s time to put back the battery compartment cover.
To do so, place the cover over the battery compartment and push upwards. Now you will hear a click sound. It means your oculus quest 2 controller battery cover is closed perfectly.
Follow the same steps to replace Oculus Quest 2 Controller Battery for the other controller.
PRECAUTION TO REPLACE OCULUS QUEST 2 CONTROLLER BATTERY
In this section , I will list some precautions you have to take when you replace Oculus Quest 2 Controller Battery.
- You should Keep new and used batteries away from children.
- If the battery compartment does not close securely,stop using the product and keep it away from children until it can be repaired.
- You should promptly recycle or dispose of used batteries in accordance with all applicable laws and regulations..
- Please do not mix old and new batteries.
- You should replace all batteries of a set at the same time.
- Please do not disassemble, pierce, or attempt to modify batteries.
- Put the battery in the correct position. Batteries can explode or leak if installed backwards, disassembled, charged, crushed, mixed with used or other battery types, or exposed to fire or high temperature.
- In the event of a battery leak, you should avoid eye or skin contact with any liquids. If contact occurs, wash the affected area with large amounts of water.
- You should remove exhausted batteries from the product promptly otherwise it might damage your Oculus Quest 2 controller.
- Please remember to remove batteries before storage or extended periods of non-usage. Exhausted batteries may leak and damage your controllers.
CONCLUSION
Summing up, you now know how to replace Oculus Quest 2 Controller Battery. I have provided detailed steps with images. Additionally, information about Oculus Quest 2 Controller and the types of battery, life, etc is also provided. At the end, precaution to replace Oculus Quest 2 Controller Battery is provided in detail.
FAQ ON REPLACING OCULUS QUEST 2 CONTROLLER BATTERY
What batteries do Oculus Quest 2 controllers use?
Oculus Quest 2 controllers use AA batteries. The right controller needs a AA battery and so does the left controller.
Do Oculus Quest 2 controllers run on batteries?
Yes, Oculus Quest 2 controllers run on batteries. Oculus Quest 2 controllers use AA batteries. The right controller needs a AA battery and so does the left controller.
How do you replace Oculus Quest 2 controller batteries?
It is very easy to replace oculus quest 2 controller battery, if done in the right way. The detailed steps are provided in the link below.
How many batteries are required for Oculus Quest 2 controllers?
Oculus Quest 2 Controllers require 2 AA batteries. Each controller requires 1 AA battery each. The right controller needs a AA battery and so does the left controller.
